jpunch
JPunch: Java UDP Hole Punching Library
Active supporters: Artjom Lind, Ulrich Norbisrath For F2F Computing we needed UDP hole punching support. As there were no libraries really supporting this available, we developed our own. This library here supports UDP Hole Punching between two random peers in the internet, if there is a possibility of a indirect communication between the peers (like ssh port forwarding via another server, chat connection). It is released under the LGPL license. We are currently working on the following paper: JPunch - Enabling Java Based P2P through Firewalls
News
-
30.04.2009 Stable version of JPunch released
We moved to github - project on googlecode is no longer valid.
-
Stable version (read only) checkout using:
svn co http://spontaneous-desktop-grid.googlecode.com/svn/tags/jpunch_stable002 jpunch
-
Development version (read only) checkout using:
svn co http://spontaneous-desktop-grid.googlecode.com/svn/java/jpunch jpunch
-
13.05.2009 Talk "JPunch - UDP Hole Punching in Java" by Artjom Lind
(Slides in PDF jpunch-slides.pdf)
Providing Back-end For JPunch
JPunch library needs a back-end for exchange of specific info (host ip addresses, network topology info and traversal instructions). The back-end could be some existing (relayed) connection between two hosts. The simplest way to establish relayed connection between two hosts is using ssh-tunneling. Next I will give some instructions of how to do that.
|
Figure 1 |
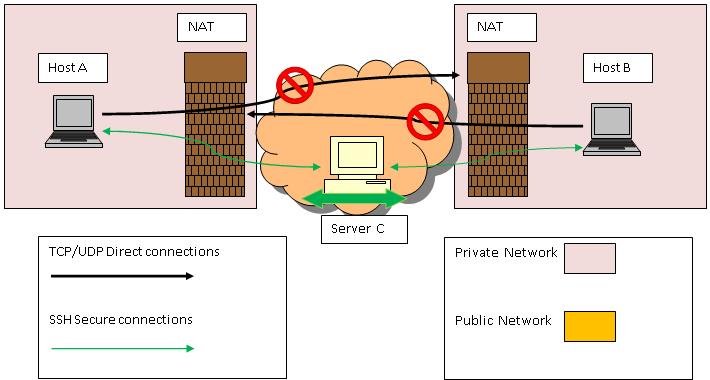
Refer to the Figure 1, there is two hosts(A,B) in private networks
that can't establish a direct connection becase of the Network
Address Translators of each submnet. But using ssh-tunnels
we can still make the communication possible. All we need is a realy
host C which is located in public network. Host C is reachable from
each private networks (A,B hosts). The goal is that hosts A and B
can ssh to each other over relay host C. Let's see now in details:
1.A and B host expose their 22 port using tunnel to C
userA@A:~$ ssh -42Cvc blowfish -gR <portA>:localhost:22 <user?>@C

userB@B:~$ ssh -42Cvc blowfish -gR <portB>:localhost:22 <user?>@C
-4 Forces ssh to use IPv4 addresses only
-2 Forces ssh to try protocol version 2 only
-C Requests compression of all data
-v Verbose mode. Causes ssh to print debugging messages about its progress
-
-c blowfish Selects the cipher to use for encrypting the session (blowfish|3des|des ).
3des is used by default. blowfish is a fast block cipher, it appears very secure and is much faster than 3des
-g Allows remote hosts to connect to local forwarded ports
-
-R <portB>:localhost:22 Forwards the connections from remote portB (on C host) to
the ssh-port 22 on localhost. That means the C host will relay all data from its portB to the 22 port of the localhost.
Now we have ssh service of hosts A and B exposed through ports portA and portB on host C. Unfortunately if host C restricts bindings on the public interfaces we can't ssh connect to it's bound ports. In other words if portA and portB will be bound on localhost interface of host C rather then on eth0, the next commands will definitely fail.
userA@A:~$ ssh -42Cvc blowfish -p <portB> <user?>@C

userB@B:~$ ssh -42Cvc blowfish -p <portA> <user?>@C
-p port Port to connect to on the remote host
In order to get use of exposed ports on C host, we need to build up some more tunnels.
userA@A:~$ ssh -42Cvc blowfish -gL 10022:localhost:<portB> <user?>@C

userB@B:~$ ssh -42Cvc blowfish -gL 10022:localhost:<portA> <user?>@C
-
-L 10022:localhost:<portB> Forwards the connections from local port 10022 of the
A host to the remotely exposed portB on host C (bound on localhost interface).
Now we have each host (A and B) in private networks forwarding the connections from the local port 10022 to the remote ports portA and portB on the C host, which are forwarded next to the 22 port of private hosts.
ssh-connection -> A:10022 -> C:<hostB> -> B:22 -> sshd
ssh-connection -> B:10022 -> C:<hostA> -> A:22 -> sshd
Now if we try to ssh connect to 1ocalhost:10022 of A host, we will actually connect to the B host.
userA@A:~$ ssh -42Cvc blowfish userB@localhost -p 10022

userB@B:~$ ssh -42Cvc blowfish userA@localhost -p 10022
That was the simple example of how to establish ssh connections between two hosts in private networks using ssh-tunnels and some public host as a relay-server. Next I will explain how to send messages from one host to another using established ssh connections. The JPunch library will use this messaging mechanism as a back-end for configurations exchange.
OpenSSH Public Key Authentication (passphrase-free login)
The ssh login generally requires the user to input the passphrase. The messaging mechanism (described below) uses ssh remote execution. It connects to the remote host with the given credentials, executes a given command, collects the result (command output) and disconnects. Each login requires user to manually input the passphrase. To simplify the process the Public Key Authentication can be used. This chapter describes how to setup passphrase login between the hosts A and B. First we need to generate the keys (private and public) if have not yet.
userA@A:~$ mkdir ~/.ssh

userA@A:~$ cd ~/.ssh

userA@A:~$ ssh-keygen -t dsa
Second we need to copy a public to the remote host. Note, that scp also uses the ssh-tunnel to connect to host B. (The connection to userB@localhost -p 10022 will be forwarded to userB@hostB)
userA@A:~$ scp ~/.ssh/id_dsa.pub userB@localhost: -p 10022
Finally, log into the host B and add the uploaded public key id_dsa.pub to the list of authenticated keys
userA@A:~$ ssh -42Cvc blowfish userB@localhost -p 10022

...

Password: ***

...

userB@B:~$ cat ~/id_dsa.pub >> ~/.ssh/authorized_keys

userB@B:~$ rm -rf id_dsa.pub

userB@B:~$ exit
At this point a copy of your key is now stored on the remote machine as an authorized keys and any ssh connection coming from the local machine will match that key and connect with the key authentication instead of a password. Do not forget to do the same on the second host
userB@B:~$ mkdir ~/.ssh

userB@B:~$ cd ~/.ssh

userB@B:~$ ssh-keygen -t dsa

userB@B:~$ scp ~/.ssh/id_dsa.pub userA@localhost: -p 10022

userB@B:~$ ssh -42Cvc blowfish userAlocalhost -p 10022

...

Password: ***

...

userA@A:~$ cat ~/id_dsa.pub >> ~/.ssh/authorized_keys

userA@A:~$ rm -rf id_dsa.pub

userA@A:~$ exit
Messaging mechanism
Two instances of JPunch running on different hosts A and B can send messages to each other using input/output redirection. In other words the output of JPunch (running on A host ) will be forwarded to the input of JPunch of B host and vice-versa. All we need are possibility to ssh between theese hosts and passphrase-free logins. Establishment of relayed ssh connections and public key authentication are already described above. Next we need to define pipes for redirecting input/output on each host. The pipes can be created using following mkfifo command
userA@A:~$ mkfifo /tmp/pipe1

userA@A:~$ mkfifo /tmp/pipe2
and on B host
userB@B:~$ mkfifo /tmp/pipe1

userB@B:~$ mkfifo /tmp/pipe2
The I/O of JPunch can be redirected using linux redirection operators < (in) and > (out)
userA@A:~$jPunch/sh run.sh < /tmp/pipe2 > /tmp/pipe1
So the output will be collected into pipe1 and the input will be taken from pipe2. Now we need to transport the data between the pipe1 of the host A and the pipe2 of the host B (and vice-versa). As we have passphrase-free logins between two hosts, we can use the remote execution. The next script will always take the data from pipe1 of the host B and put it into the pipe2 of the host A.
userA@A:~$while [ true ]; do \

ssh -42Cvc blowfish userB@localhost -p 10022 "cat /tmp/pipe1" > /tmp/pipe2; \

done;
same for host B
userB@B:~$while [ true ]; do \

ssh -42Cvc blowfish userA@localhost -p 10022 "cat /tmp/pipe1" > /tmp/pipe2; \

done;
The script uses established ssh-tunnel to the B host.
(ssh -42Cvc blowfish userA@localhost -p 10022). Next we add the
remote execution of "cat /tmp/pipe1". That will take the data from
the pipe1 of the remote host and put it into the pipe2 on the
localhost (> /tmp/pipe2). The while loop will repeat the remote
execution. Now the messaging between different Jpunch instances is
working properly. So the JPunch is provided with the back-end for the
configuration exchange. The described while loop should be started
before the main program. It is reasonable to have two different
terminals for the loop and for the JPunch program. Host A Terminal
#1
userA@A:~$while [ true ]; do \

ssh -42Cvc blowfish userB@localhost -p 10022 "cat /tmp/pipe1" > /tmp/pipe2; \

done;
Terminal #2
userA@A:~$jPunch/sh run.sh < /tmp/pipe2 > /tmp/pipe1
Host B Terminal #1
userB@B:~$while [ true ]; do \

ssh -42Cvc blowfish userA@localhost -p 10022 "cat /tmp/pipe1" > /tmp/pipe2; \

done;
Terminal #2
userB@B:~$jPunch/sh run.sh < /tmp/pipe2 > /tmp/pipe1