Introduction to the Internet of Things (IoT) for Makers and Doers
This class can be taught in 6-8 sessions with 2-3 hours each or in 4-5 sessions with 5-8 hours each. Session 7 and 8 are reserved as buffer or for projects. It is expected that participants are willing to spent a little time outside of the class for finishing up class contents and project work or engage in helping their peers.
This class was running first at the GMU MIX at George Mason University in Virginia, USA taught by ulno. If you are a GMU student or faculty, you can check out a course kit at the MIX and still take the class at any time of your convinience in the MIX.
Feel free to discuss problems, mistakes, and new ideas in our friendly community here: ulnoiot@matrix (on matrix in the room ulnoiot) or on github.
I am currently updating this class for the new (non micropython based) version of ulnoiot. Most of the text here should reflect the new version, but the videos are still mostly designed for the legacy verison of ulnoiot.
Navigation
-
Sessions
Hardware
To take this class, you need either a specific UlnoIoT development kit, or make sure you have at least the following items:
-
Raspberry Pi 3 (any version) (if you want to connect a WiFi network, you also need another WiFi usb stick - however, make sure you get one which is supported by the Raspberry Pi, connecting via ethernet is preferred),
also make sure you have a beafy enough power supply for the Pi (2A or 10W)
and a Class 10 8GB (or 16GB or more) SD card.
You can also order a case, but it is also easy to 3D print a case yourself for the Raspberry Pi.
At least 2, better 3 or more ESP8266 Development Boards - for example the Wemos D1 Mini, NodeMCU, Adafruit Huzzah, Espresso Lite V2 (+ one serial/FTDI adapter for the teacher -> basically the adapter is only needed for the intial flash)
-
Several sensors and actors, at least:
1 button or capacitive touch button,
one or better more RGB led(s) and/or RGB led strip(s) and if the strips are longer than 10 led's a respective power supply (probably 5V DC for a WS2812 or 12V for WS2811),
a relay switch, a dht11 or dht22 temperature/humidity sensor,
an analog rain sensor,
a HC-SR04 distance sensor,
a micro servo motor like the Tower Pro SG90 (make sure it's a real servo motor and not a "hacked" 360 degrees motor)
At least one micro usb cable per development board
Jumper cables and
at least one breadboard to connect actors and sensors
-
Optional:
noise sensor
light sensor
mini i2c lcd display
FTDI adapter and sonoff basic
Android phone or Google Home with Google assistant
1. IoT and UlnoIoT Intro
Class Intro
-
Introduction (Teacher and students)
-
Everybody writes down:
What is the Internet of Things?
How does it impact you personally?
What could be solved?
-
This syllabus (the current web-page you are looking at - and how to find it)
Taking notes is crucial! Also write down mistakes (these are the truly valuable gems, which allow you to explain to others what you learned and experienced).
IoT Intro
Collect in discussion IoT notes from before
Compare with this IoT Slide
Raspberry Pi Gateway setup
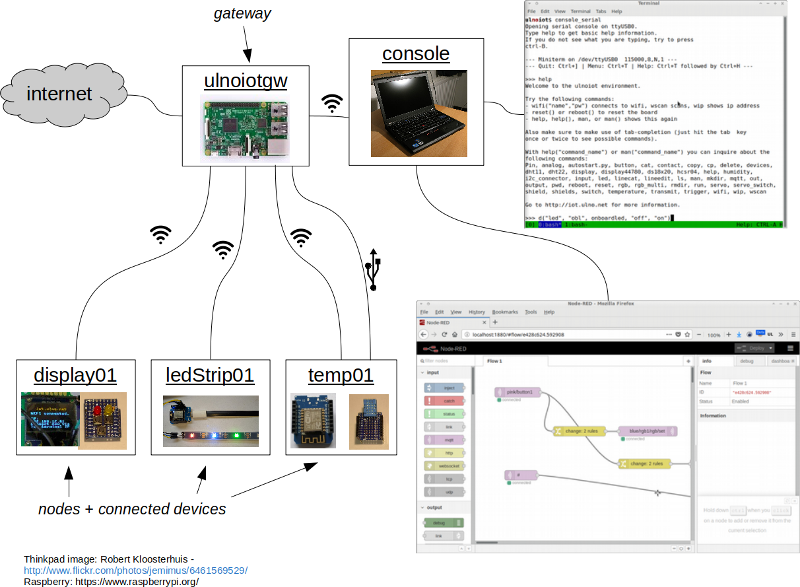
Check out and familiarize yourself with the UlnoIoT Architecture
The UlnoIoT installation manual is here.
[Note to teacher: SD Cards should be prepared in advance (20-30min each).]
Tutorial videos for inital setup and ssh access (for new versions of ulnoiot after 2018-11-04, you can skip the ssh part as a file browser and small web-based command line is included, just connect to https://ulnoiotgw.local and accept the self signed security certificate):
Linux "just" follow manual
Switching A Light Remotely
As a first project, we just want to toggle the blue onboard-led on one of the wemos chipsets on or off.
In additon to the Raspberry Pi, we need one Wemos D1 Mini (or other ESP8266 development board with onboard led) and a usb-cable.
Instructions:
-
Preparations
Connect to the wifi network of you pi (something like with the network name
iotempire-xxxxxxand a passwordiotempireX. X and x can be empty or will be told to you in class (they can also be configured in the /boot/config.txt file) with your computer, tablet, or phablet.Open https://ulnoiotgw or https://ulnoiotgw.local with your browser (firefox preferred, but other browsers should work too), and accept or create an exception for the self-signed security certificate. (Make a note to ask your teacher later, why you had to do this and why this usually is a bad idea.) You might be asked for more usernames and passwords, these will usually be just ulnoiot and iotempire. If you are interested ask how you can change these.
-
If you have some Linux or Unix experience, you can also log in to UlnoIoT on the Pi via ssh, make sure to enable X-forwarding to be able to use the clipboard and look at the sub-points here. If not forward to the next point and ignore this one.
Open Midnight Commander (mc) - via typing mc + pressing the Enter key
Make a folder iot-[yourname]
Copy the contents of ulnoiot/lib/system_template into your iot-folder
Rename node_template into node1.
For debugging purposes, you migh tlater want to type console_serial (or activate from user menu in mc, which you can also call with F2)
If you are using the browser to access ulnoiot, open your iot-test folder.
You should have a readily configured node1 in there, but you can make a copy of that folder, and remove the key.txt file form the copy to later initialize this node.
-
Flashing nodes with UlnoIoT (this point might usually be more interesting for a teacher. As a student, you can probably skip this part for now as your devices might already be flashed with ulnoiot).
Connect via browser or ssh to a Wemos D1 Mini to your Raspberry Pi.
Enter a node folder.
opena console (either in ssh or via pressing ')
Type initialize serial (wait until done) (you can check for errors while in mc with pressing ctrl-o - and ctrl-o if you want to go back to mc)
-
If the esp8266 developer board (like the Wemos D1 mini) was already flashed with ulnoiot, you can initialize it over the wireless network.
If your board has already a flash button (like on the NodeMCU), there is no further preparation needed. On a board without a flash button (like the Wemos D1 mini), connect a button to ground (G) and the D3 port.
Enter the node1 folder (or your copy of it) from the browser or in ssh. If using the browser, open a console with the respective button in on your webpage or press the ' key. You should see something ending in your node name (probably node1) in the last line of the opened console.
-
Bring your developer board/node into reconfiguration node:
Reset the board or power it off and on again. The onboard-led should start flashing rapidly. While it is falshing (you hav 5s time), press the flash button (or the one you just connected) 2-3 times and release it again.
After a couple of seconds the led should start blinking in a morse code (several long flashes, several short ones). Count these flashes and note them down. The node has now opened its own open wifi network, named something like uiot-node-xx-ls with l being the number of long flashes and s the number of short flashes.
Connect your phone or a computer to this wifi network. If you have a modern phone or use firefox on a laptop, you might be automatically sent to the sign-in configuaration page. If you are not at the configuration page, go manually to http://192.168.4.1 and from there to the wifi-configuration.
In the wifi configuration, connect your node (the developer board) to your personal raspberry pi ulnoiot network (ssid: iotempire-XXXXX/ pw: iotempireX).
You should now be disconnected from that network - if not, you might have to do the configuration again.
The leds should have stopped flashing and you shoudl be in reconfigration mode for the next hour. If you reset the node again or disconnect the power it will start up normally again and forget your changes. Then you have to enter reconfiguration mode again.
You should be still in a node folder (like node1) in the browser in a console (or in ssh). Type here
initialize. If this finishes with showing success, you have now successfully adopted your node to the ulnoiot network.If you open the node-red gui now from the initial web-page, you should be able to switch the onboard-led with the switch button in the example view (you have to go from the admin view to the example view).
Congratulations, you have managed your first ulnoiot class.
2. First IoT System
In this session, we will build a first Internet of Things system consisting of several nodes. We assume the ulnoiot raspberry pi gateway is successfully set up and running, one Wemos D1 Mini is flashed successfully and you were able to toggle the blue light.
UlnoIoT Hello World
This is the main project, which should be implemented in this session.
The instructor will demonstrate once in the beginning of the class live how to set this up, take soem notes!
Then you can follow the instructions below or the youtube tutorial video.
It is a first Internet of things system consisting of one gateway, two nodes and two devices. As it is very simple and a typical first tasks when building IoT Systems, we call it the "IoT (or UlnoIoT) Hello World".
The task is to use a button connected to one node to make the onboardled of the other node turn on, when pressed and turn off when released.
Optional: Add another LED.
As hardware, we need:
1x UlnoIoT Raspberry Pi gateway
2x Wemos D1 Mini
1x breadboard
A couple of jumper cables
Keyes Button Board (or just a simple touch or physical button)
Instructions:
-
Preparations
Log in to UlnoIoT on the Pi via browser or ssh
Go into your project folder
Make a copy of node1 to node2.
Adopt the second node (node2 - or your name) like described in the first class.
Take a closer look at setup.cpp and read about out and input in uhelp
Enter the node-red configuration view and try to switch both nodes' on-board led's with the flash-button of the second led.
3. Networking Systems: Node-RED
IoT Hello World in Node-RED
You can read more on Node-RED on https://nodered.org/
Attention, TODO: the following is not yet updated to the newest ulnoiot version, continue reading critically and come and ask questions on our online forum.
Make sure you have your autostart.py configured so that you automatically start one node as button and one as blue onboard-led light (you can follow this tutorial: https://youtu.be/FChNsMsLltA). The two nodes (button and light) should be plugged in and running.
Node-RED comes pre-installed on the ulnoiot raspberry pi image. You can open it with a browser going to the link http://192.168.12.1:1880
Here, is the corresponding tutorial video:
If there is an old project still loaded, create a new flow, and delete the old one.
Create an mqtt input node.
Configure localhost:1883 as mqtt server (inside config for input node). Subscribe to topic #.
Create a debug node.
Connect the debug node to the input node.
Deploy and watch the debug output when pressing the button.
Add an mqtt output node. Use topic node1/blue
Change topic of mqtt input mode to node2/b1
Wire mqtt input to mqtt output.
Deploy and test (pressing the button shopdu turn on the light).
In the second phase of this project, we want to toggel the light with the button.
Create a function Node-RED node.
-
Add the follwing code to it and call it toggle:
Insert this new toggle node in beween the mqtt-input-node and mqtt output node.
Deploy and test (and if necessary use debug nodes to debug output of particular Node-RED nodes).
Add an rbe node after the matt input and before the toggle-node.
_ Deploy and test again.
Optional:
Dashboard (Use dashboard to also toggle light).
Add DHT11 temperature sensor, read values in debug.
Visualize temperature cureve in dashboard.
Control RGB led (single) through dashboard and set different colors.
Send message (trigerred by button) via IFTTT to your phone.
4. Weather Station
Temperature/Humidity
Let's add a temperature/humidity sensor to Node-RED.
-
Wire a DHT11 to a Wemos D1 Mini (or other ESP8266 development board), which has been configured as a node in ulnoiot.
ESP8266 G Pin to DHT11 GND
ESP8266 D1 Pin to DHT11 DATA
ESP8266 5V Pin to DHT11 VCC
-
Add to the autostart.py (or run on console):
d("dht11", "th", d1) Open Node-RED (http://192.168.12.1:1880).
Disable the current flow.
Create new flow.
Add new mqtt input node and set it to topic
node1/th/temperature(or use the corresponding name to node1 if you run this on a different node).Add from Dashboard Category a
Gaugeand aChart. Configure them with reasonable label-names and ranges.Wire them to the input node.
Deploy and check http://192.168.12.1:1880/ui
Rain/Water Sensor
Wire rain-water sensor with - to ground, + to 3.3V, and S to A0
Add an analogue sensor to ulnoiot (try
help("analog")) or used("analog", "water", precision=10)Run and watch behavior when it gets wet or touched.
(Sometimes a restart is necesary if too many values have been processed.)
Add a reasonable threshold (from values you have seen) to turn analog sensor into digital sensor.
Optional
Centigrade to Fahrenheit
Add air quality sensor
Desktop remote control
5. Home Automation (1)
RGB Led
With RGB-Leds (and corresponding strips), you cna build your own home mood lighting or even real adavanced lamps for desk work.
Wire up the - port of the led to GND, and the other ports to data ports. Apply the rgb-command from ulnoiot, an example would be:
d("rgb","led1", d2, d3, d4)
Don't forget run() and eventually putting this file into the autostart.py
of your node (inside the copy folder).
Relay
A relay (or relais) can be used for lots of things. It's especially helpful to switch higher volatage or current devices or appliances like a solenoid (for a smart lock), a pump, toasters, coffee machines, electric water kettle. There are some very affordable commercial versions of the esp8266+relay, called sonoff.
Wire - to ground, + to 3.3V (or if the relay doesn't switch reliably to 5V), and the signal port to a data port. Use an output object in ulnoiot to address it.
For example:
d("out", "rl1", d3)
Optional
-
Google Assitant/Home, voice integration
Use IFTTT with Adafruit-that and connect to Adafruit via another mqtt-node in Node-RED
-
Alexa via Phillips hue bridge.
use ha-bridge
Reed Switch sensor
6. Home Automation (2)
Servo Motor
Like a relay, also a servo motor can be a very versatile tool for manual pressing, switching, or turning. You can build non-intrusive smart light switches with it, or turn your door lock into a smart lock.
There are two ways of using a servo in UlnoIoT:
-
Simple Servo (command "servo")
Use a command like this:
d("servo", "m1", d5)
-
Servo Switch (command "servo_switch")
Use a command like this:
d("servo_switch", "m2", d3, 10, 150)
Optional
Noise sensor
Add mini display
distance/motion detect
RGB-strip
Power saving on the ESP8266
7. Combinations
Let's combine different sensors, actors, and our smartphones to build bigger systems
8. Integration
Integrate your ideas with your neighbor into even bigger systems.
Potential Project Ideas
Weather station with rgb visualization
Automate your own home
Park noise monitoring
Brewing meter
Interactive clothing (indicator hat)
Performance automation
Interactive toys (plush owl with blinky eyes)
Restaurant stock registration
Resources
matrix community chat room #ulnoiot:matrix.org