Reviving GULEEK i8 with broken Display with Headless Magic and Arch Linux
In February 2016, one of my Maker friends in Jakarta, Indonesia pointed me to an offer of an all-in-one PC too hard to pass up. It was a GULEEK i8 with Intel Quadcore Atom processor (Baytrail), 2 GB Ram, 16Gb ssd, built-in battery, 2 USB 2.0 Ports, micro sd-card reader, Windows 8.1 pre-installed. The whole package sold for incredibly low $70 a piece.
I was not so sure that Windows 8 would perform well on this, so I did a little Internet research and found a couple of people successfully running Linuxes on these machines. I thought these might make great powerful replacements for some of my Raspberry Pis. Especially, if I would not need graphics and ran them headless -- what did I know what I asked for there - see below.
We purchased 3 pieces of this, they arrived two weeks later. My friend tried to upgrade one of them to Windows 10, but had trouble due to space limitations. I installed Ubuntu on the other two (after making a backup of the disk to be able to go back to Windows), having only to replace the 64 UEFI boot loader with a 32 bit one. However on one of the two remaining GULEEKs the Display started to fail - it was just not possible to get an HDMI-out signal anymore. There are several instances in the net where this is described (search for guleek i8 no display), but no consistent solutions. The problems also seem to be not Linux specific, so it seemed to happen in Windows too (I restored my windows image, but to no effect - not sure if it really booted up again though).
Usually it is suggested to try to connect the failing GULEEK to different screens, let the internal battery drain, and connect another day to check again. And I have to admit on some random occasions my display came back, but it was lost very quickly again soon after. So, I was forced to find a solution to drive this device headless.
Fortunately I had a version (with a blue and not a red power led) which seemed to be stable to use as a reference for typing things blindly.
Recently I lost - due to an update to Ubuntu 17.04 - access to this one machine, so I had to boot it from a rescue image. But how can you select to boot from a rescue image if you cannot get any display output on such a machine? The solution was using a default USB-Ethernet adapter, typing some things blindly, and booting from an arch-linux install cd.
To boot from an external device, try to do the following:
Make sure the GULEEK is powered off (you might have to disconnect everything and press the power button for approximately 20s until the power led is off)
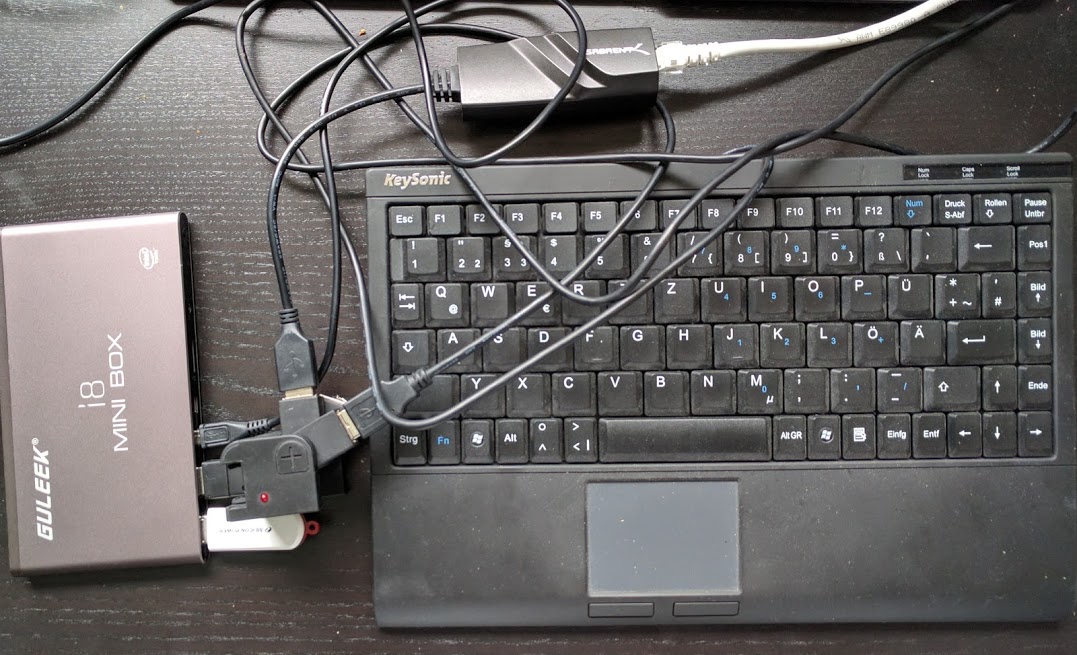
Attach a simple but verified working USB-hub with a USB-Ethernet adapter and a USB keyboard attached to one of the USB ports of the GULEEK and USB-Stick with a flashed arch install image to the other. Make sure the keyboard and USB stick have LEDs so you can get at least some feedback. Compare with the initial image in this article.
Press power on button until the power led turns on and keyboard leds all flash on, continue quickly to next step.
-
There are now two possibilities to get into the rescue system, try and see, which one works:
Via boot menu:
Directly start pressing F7 repeatedly (for about 7s, this should enter the boot menu)
Press up, up, return (sometimes also: up,up,up,return)
Via bios menu:
Directly start pressing del repeatedly (for about 7s, this should enter bios menu)
Press left, up, up, up, return
Wait for numlock light to turn off (activity led on usb stick should flash a lot before that, then no activity for a while). If you can monitor your router/DHCP server, wait to see that an IP was requested.
-
Now press the following (stuff in square brackets is comment, ignore):
return [confirm welcome menu]
return [confirm another menu]
9 [select exit to shell]
return [go to shell]
3
return [enter first password, it will be 3]
3
return [confirming password]
Now check your IP from router or guess it and
ssh myip -l rootEnter 3 as password.
Hopefully you are now in the arch rescue system
Use
fdisk -landmount /dev/mmblk1p3(last number might vary) to access existing data or partitions.You can also follow the Arch Installation Guide to install here Arch from scratch. Don't forget to install openssh and enable ssh access (create authorized_keys in .ssh with correct permissions) to have access later.
Another option is to use a 32-bit version of the system rescue CD, this could even allow you to gain access just via serial USB.
After you have installed a base system, I highly suggest to enable at least one tty to login via serial, this helps if something with the network goes wrong. This is described here: https://wiki.archlinux.org/index.php/working_with_the_serial_console#Without_GRUB2.2C_systemd_only
Careful, you really have to try to connect with 9600 or 38400 baud. If you want to connect with 115200 baud, you have to build your own systemd service file as described here: http://0pointer.de/blog/projects/serial-console.html
If you happen to have a real FTDI serial USB adapter, you can even enable serial at the EFI-prompt. For this you need the following 32-bit efi drivers:
FtdiUsbSerialDxe.efiTerminalDxe.efi
Create a file startup.nsh with approximately the following content:
echo Activating serial terminal
load fs0:\efidrv\TerminalDxe.efi
load fs0:\efidrv\ftdi.efi
echo Serial terminal activated.
pause
echo Loading Grub
fs0:\EFI\boot\grub.efi
Copy these to the root and into an efidrv directory on the ESP partition
and use efibootmgr to
select with the -n option a one time boot to test-boot into the built-in shell.
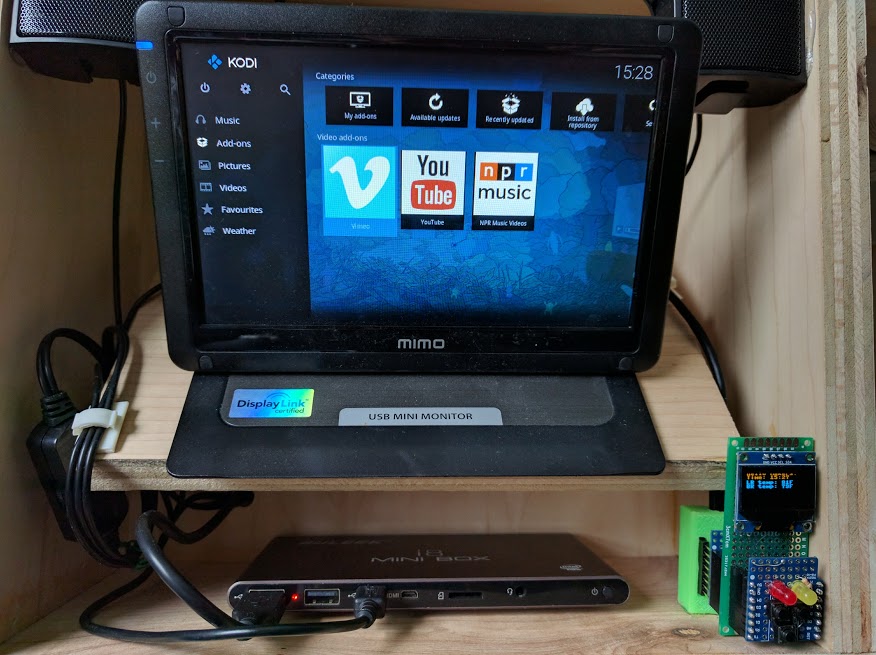
Guleek now in the eHomeDemonstrator 3, running router, gateway, and media-center (kodi) software
As you see in the picture, I attached to my now headlessly installed machine a Display Link driven USB display (an old 7 inch MiMo Monitor). It basically just works, but might have to be enabled via xrandr or arandr (to switch away from the broken intel display output). Something like this should do the trick:
xrandr --output HDMI2 --off --output HDMI1 --off --output DVI-I-1-1 --mode 800x480 --pos 0x0 --rotate normal --output VIRTUAL1 --off --output DP1 --off
You can use any old monitor with the adapter I linked below.
Inspite of these hassles, I still think these machines are still a tremendous value for money. If you are interested in picking one up (only seeing a slightly more expensive successor offered at the moment) and supporting me, please click on the affiliate links below.
Let me know if you want to read more like this and share your ideas in the comments.
Comments